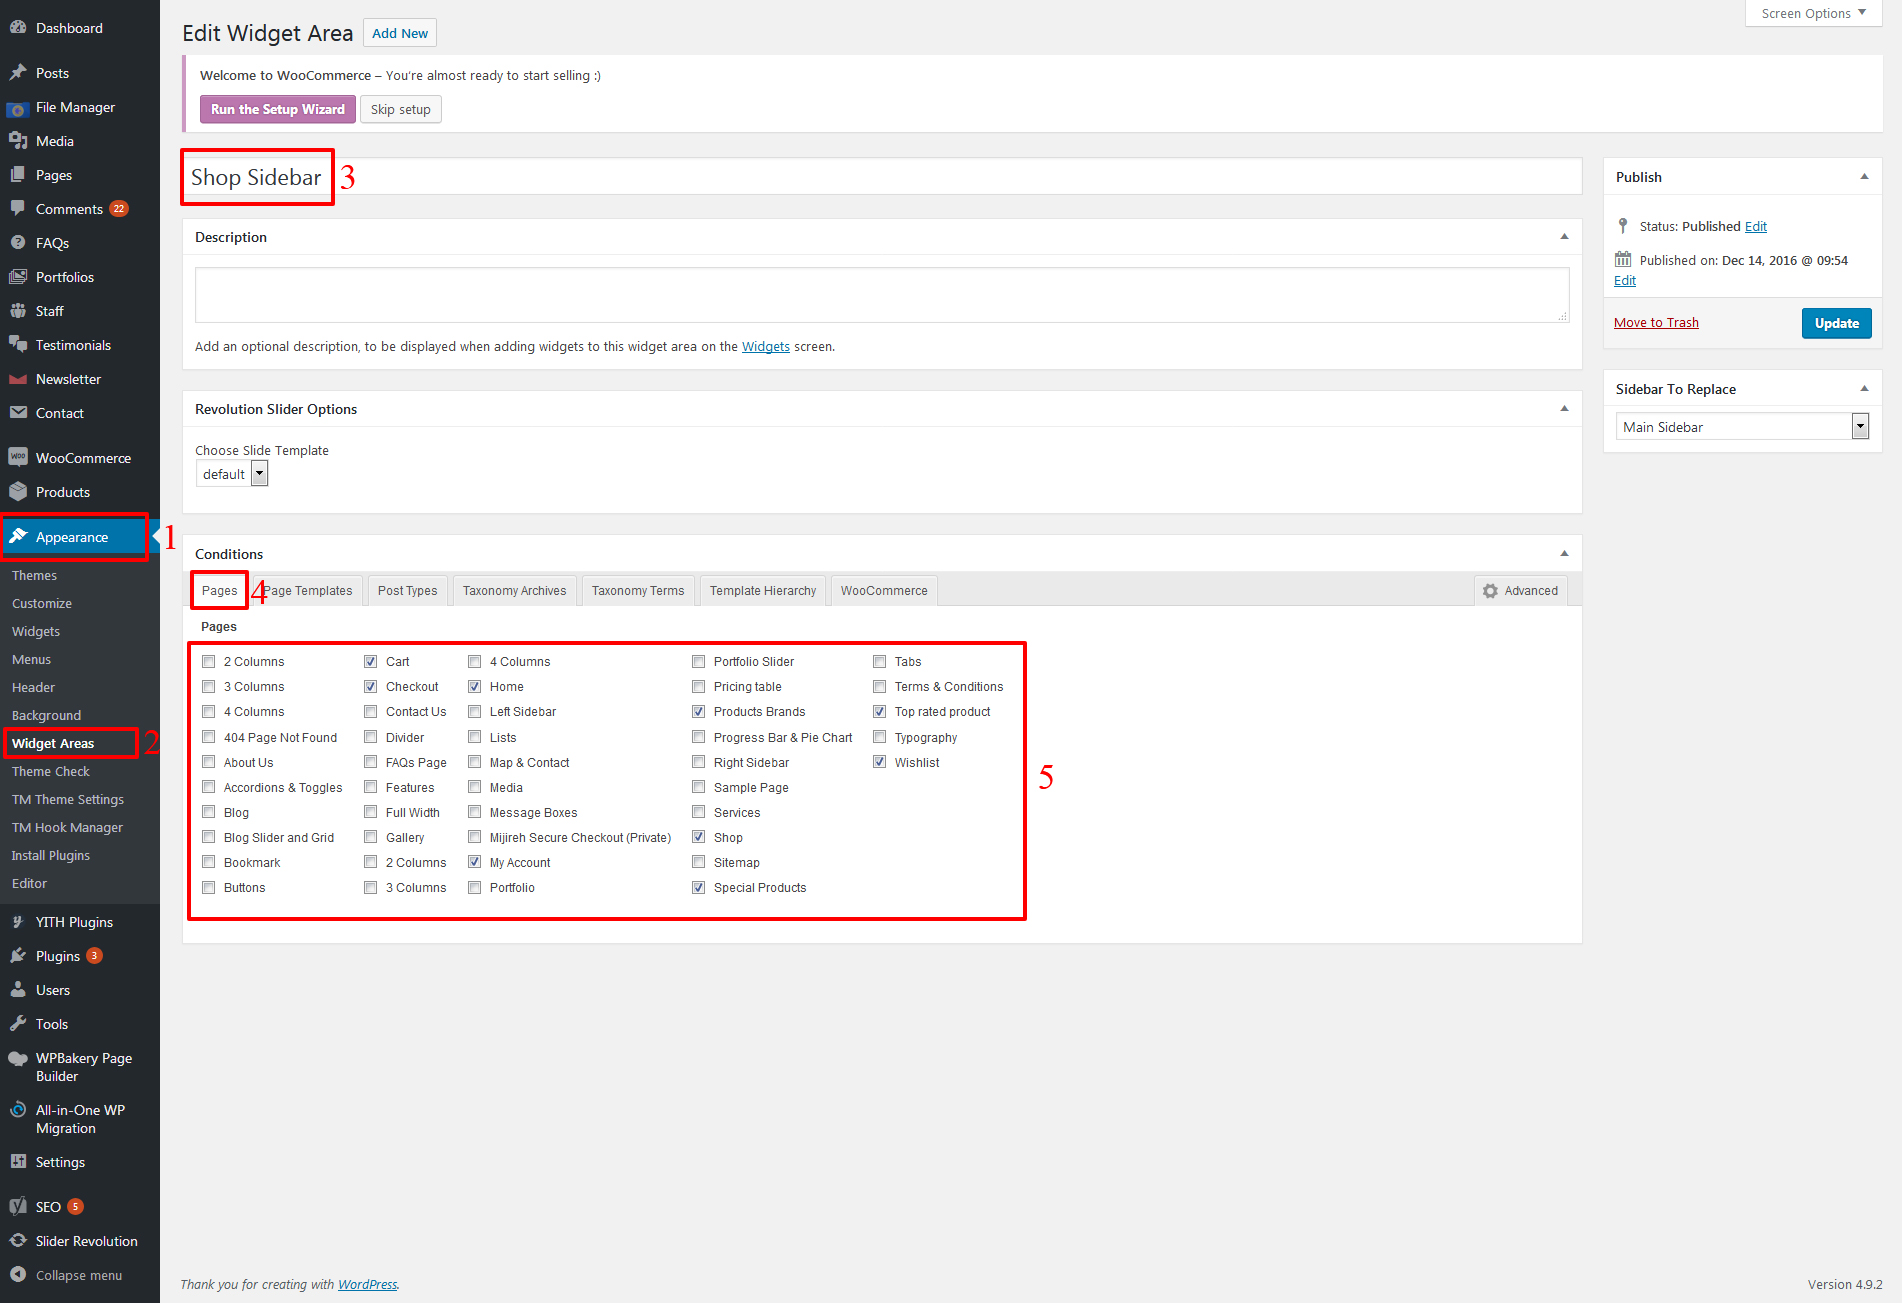
Homepage Configuration
Go to Admin > Settings > Reading > Reading settings
To display Homepage as landing page and posts listing page as Blog page follow
below Steps:
Step 1: Select "A Static Page" option
Step 2: Select Homepage as Front Page
Step 3: Select Blog page as Posts Page
Step 4: Save Changes

WooCommercepage Configuration
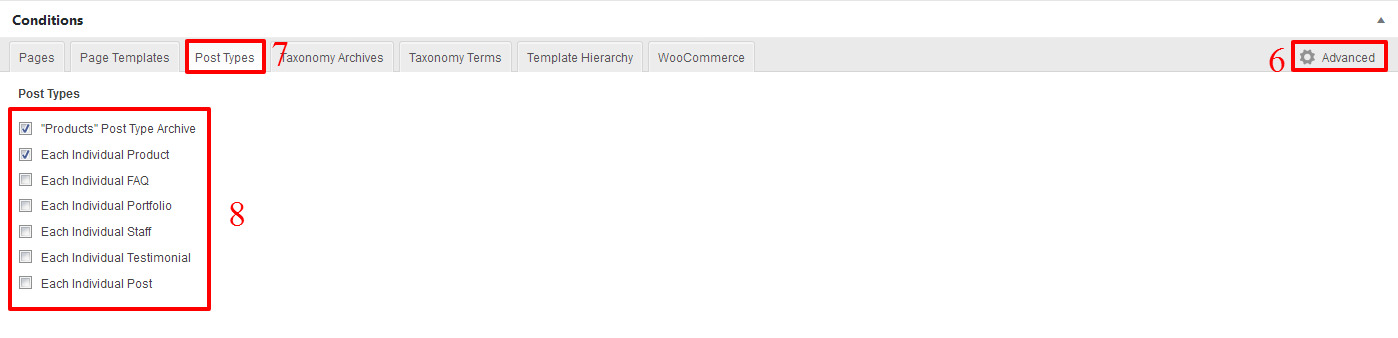
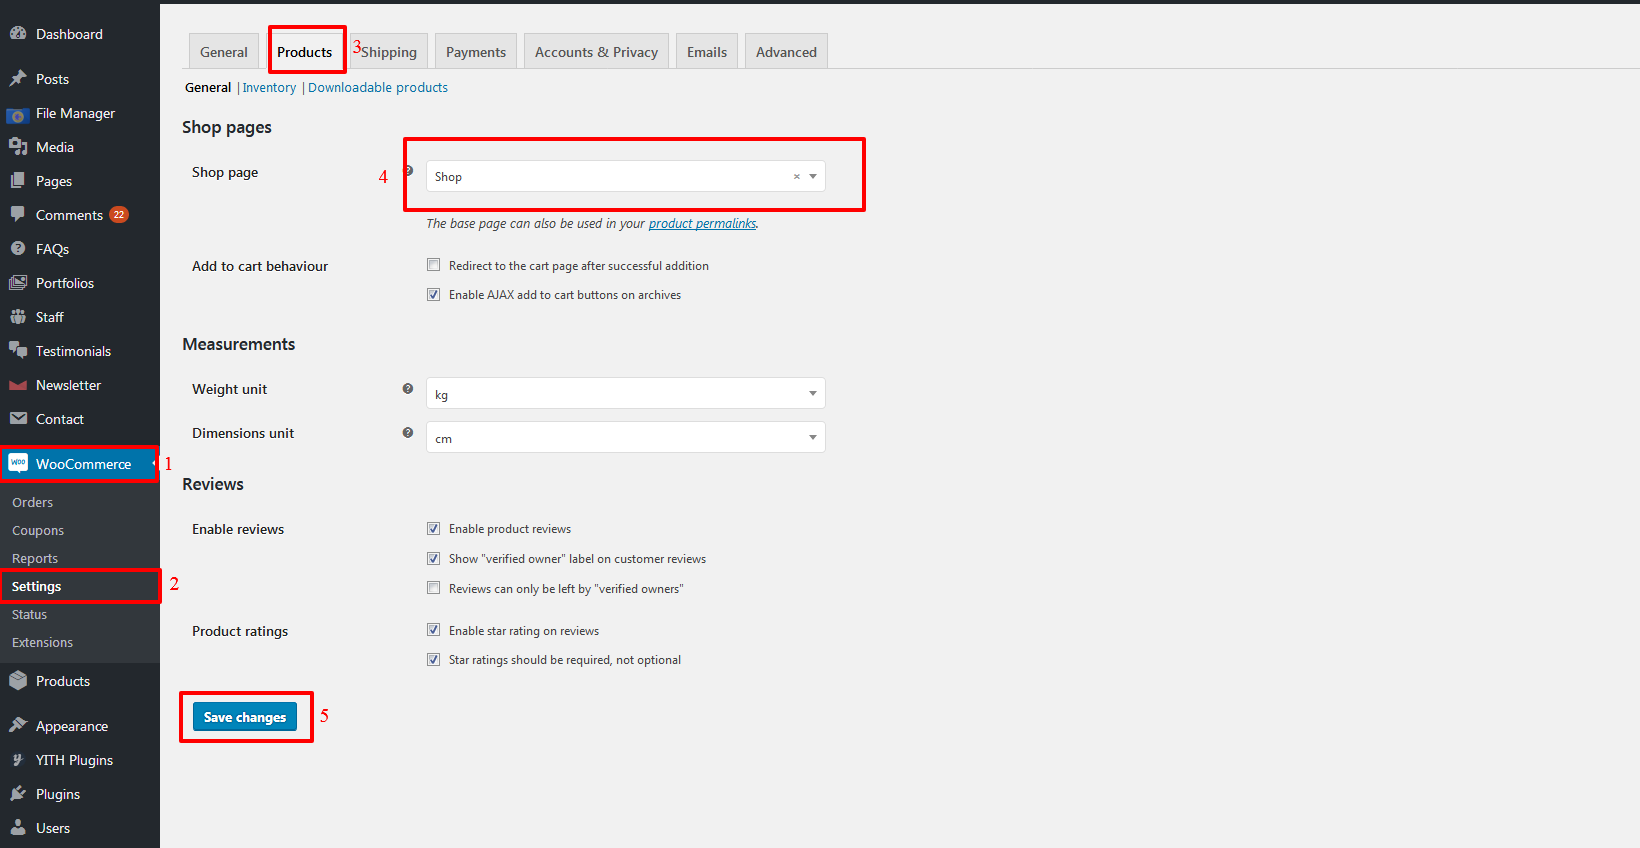
WooCommerce Products Configuration
Admin Panel > Woocommerce > Settings > Products to
change the Products settings.
Step 1: Click on Products tab
Step 2: Select "Shop" as Shop Page
Step 3: Save Changes
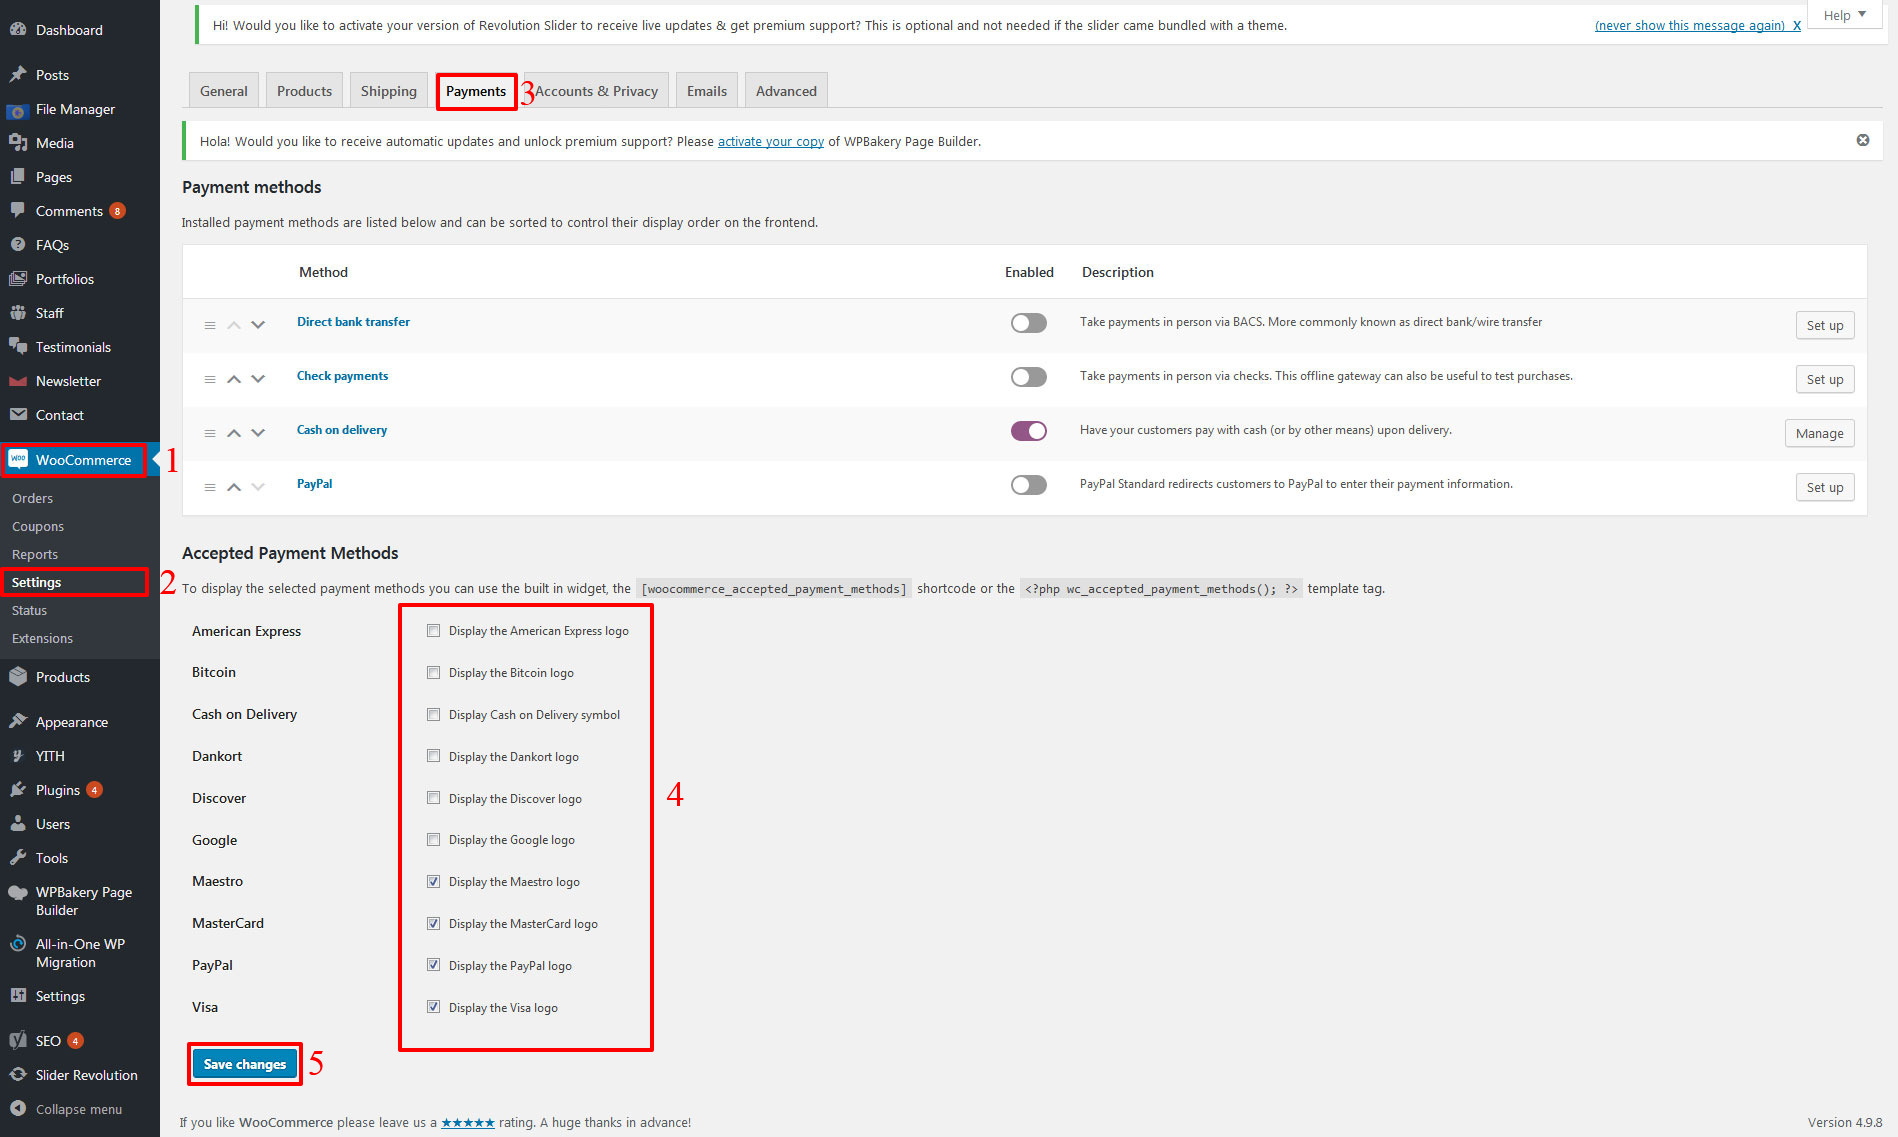
WooCommerce Payments Configuration
Admin Panel > Woocommerce > Settings > Payments to
Select Payment Method.
Step 1: Click on Payments tab
Step 2: Select "Payment Method" as you want to display
Step 3: Save Changes
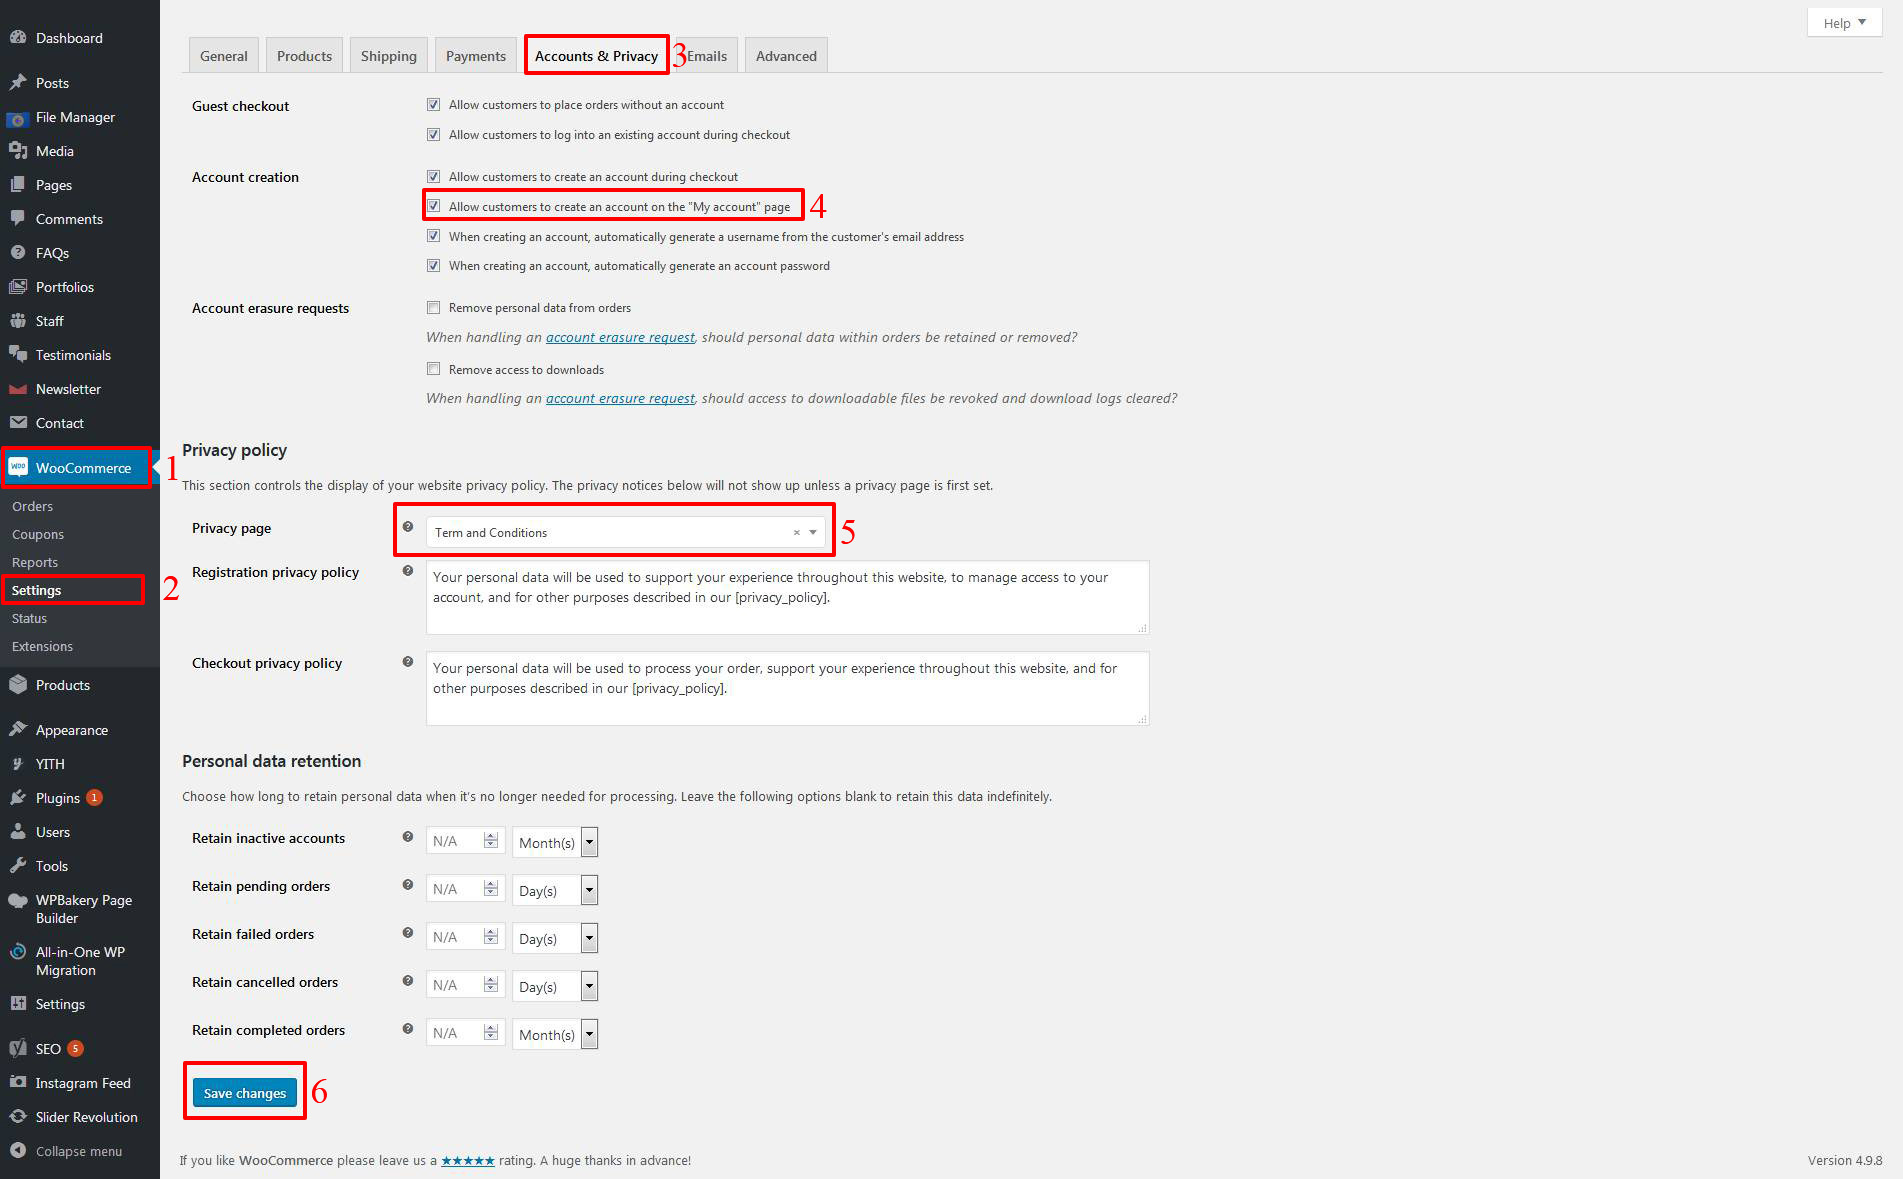
WooCommerce Account & Privacy Configuration
Admin Panel > Woocommerce > Settings > Accounts & Privacy
Step 1: Click on Accounts & Privacy tab
Step 2: Check "Allow customers to create an account on the My account page " in Guest
checkout as you want to display
Step 2: and Below Privacy policy select "term and Conditions" Page In Privacy Page as you
want to display
Step 3: Save Changes
WooCommerce Checkout,Cart, My Account Configuration
Admin Panel > Woocommerce > Settings > Advanced to
Select the Checkout Process and Cart Page and Account Page.
Step 1: Click on Advanced tab
Step 2: Select "Cart" as Cart Page
Step 3: Select "Checkout" as Checkout Page
Step 4: Select "My Account" as My Account Page
Step 5: Select "Terms and Conditions" as Terms and Conditions Page
Step 6: Save Changes

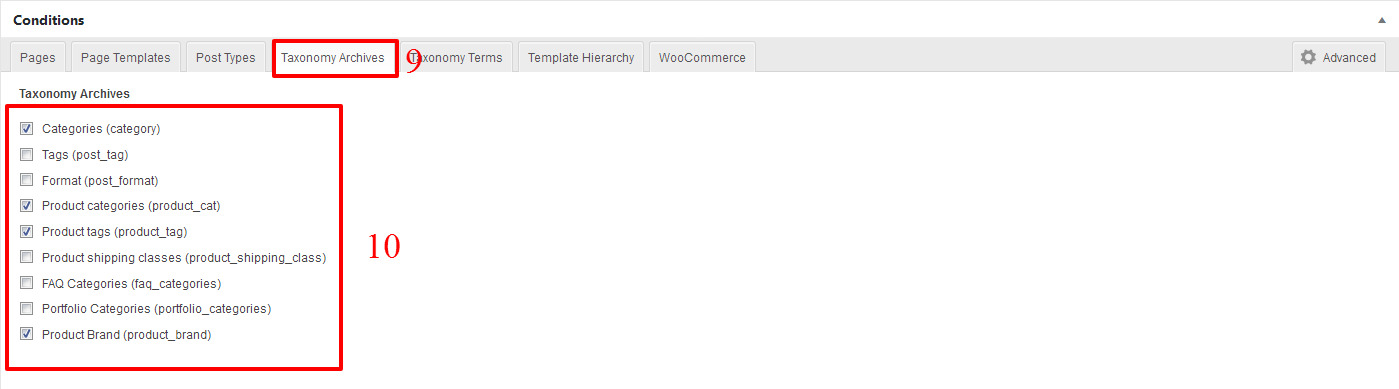
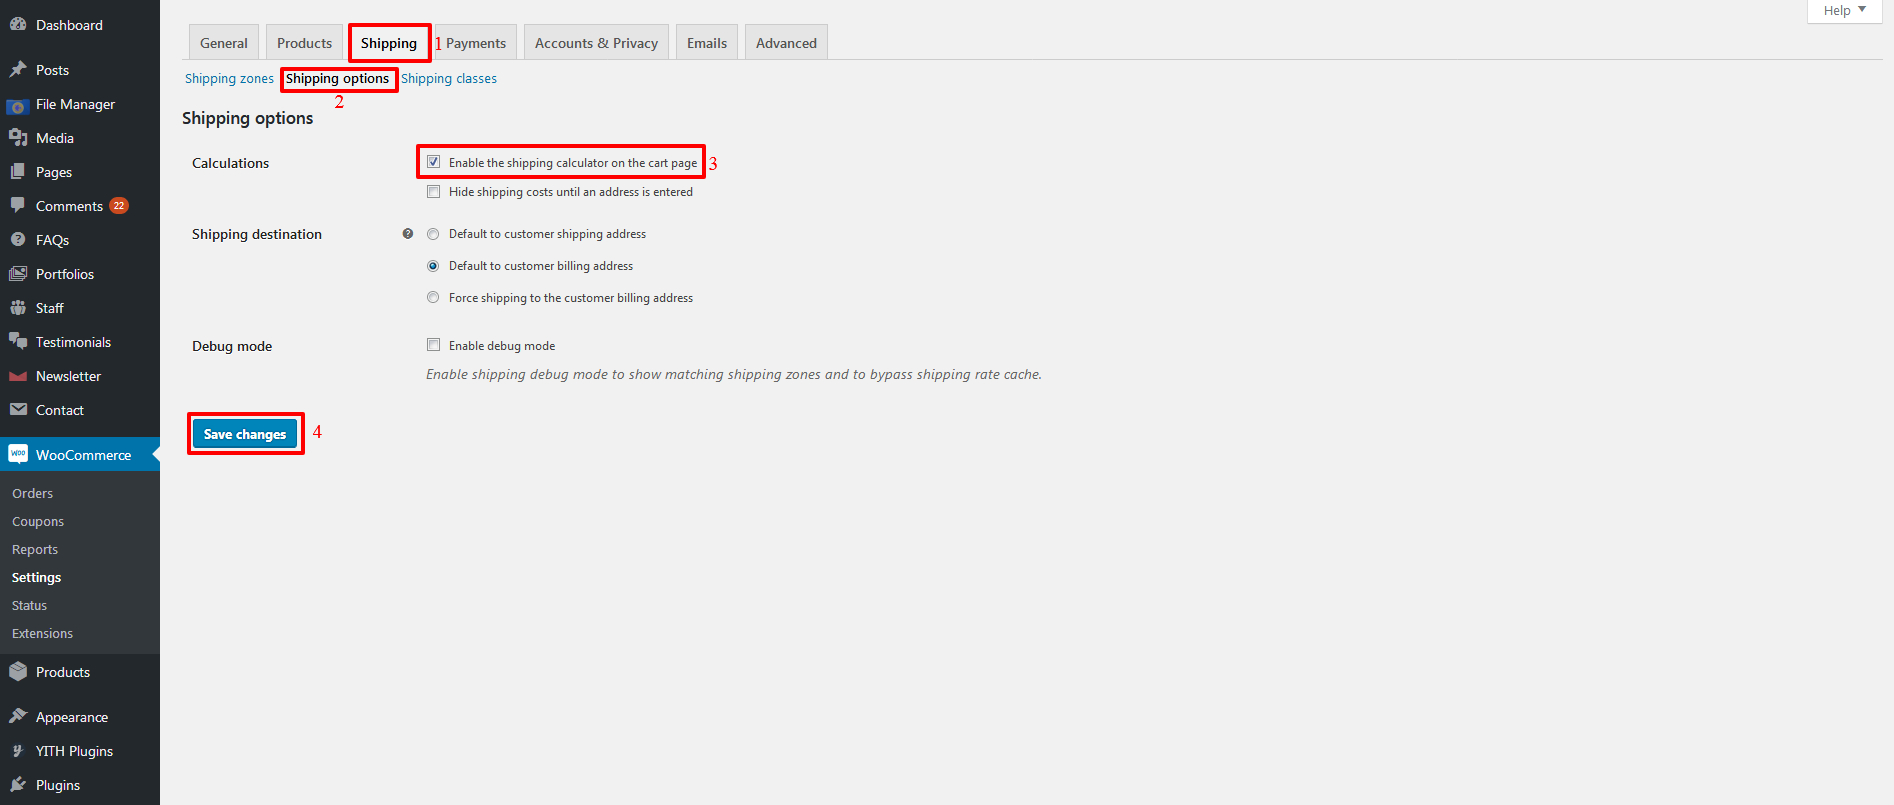
WooCommerce Shipping Configuration
Admin Panel > Woocommerce > Settings > Shipping to
change the Shipping settings.
Step 1: Click on Shipping tab
Step 2: Click on Shipping Options tab
Step 3: Select "Enable shipping" as Shipping Calculations
Step 4: Save Changes
Step 5: To Add Shipping method and zones follow this document

Select Checkbox and Enable other shipping method like Free Shipping , International Flat Rate ,
Local Delivery as Flat Rate.
Step-6 : Shop Configuration
- We are providing different customizer For Shop Configuration.
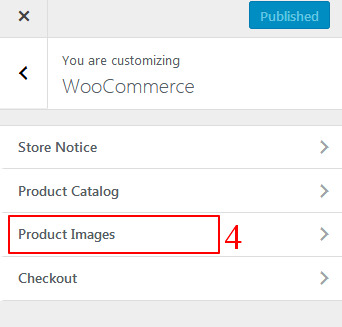
1. First option
Step 1: Go to Appearance > Customize
Step 2: Select Woocommerce Tab
Step 3: Select Product Images Tab
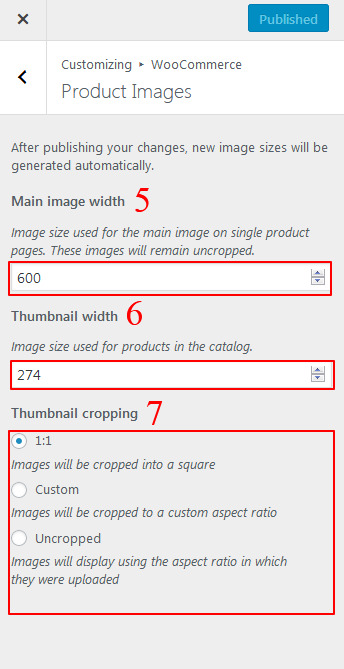
Step 4: Final Set The Product Size And Thumbnail cropping As Mentioned And Click On Publish
Button


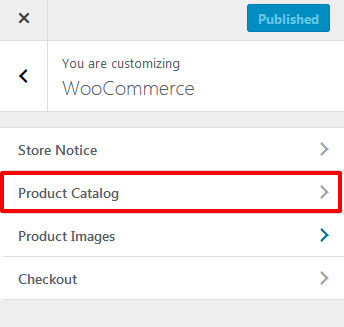
2. Second option
Step 1: Go to Appearance > Customize
Step 2: Select Woocommerce Tab
Step 3: Select Product Catalog Tab
Step 4: Final Set From Dropdown As Mentioned And Click On Publish Button
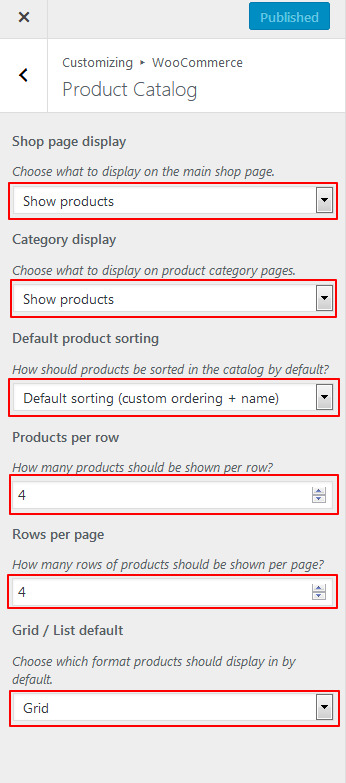
Step 1: Shop Page Display
Choose what to display on the main shop page.
Select Show Products From Dropdown.
Step 2: Category Display
Choose what to display on product category pages.
Select Show subcategories From Dropdown.
Step 3: Default Product Sorting
How should products be sorted in the catalog by default?
Select Default sorting (custom ordering + name)
Step 4: Products Per Row
How many products should be shown per row?
set 3 Products
Step 5: Rows Per Page
How many rows of products should be shown per page?
set 4 Rows
Step 6: Grid / List Default
Choose which format products should display in by default.
Grid Or List
Step 8 : Customizer Configuration
Customizer Configuration
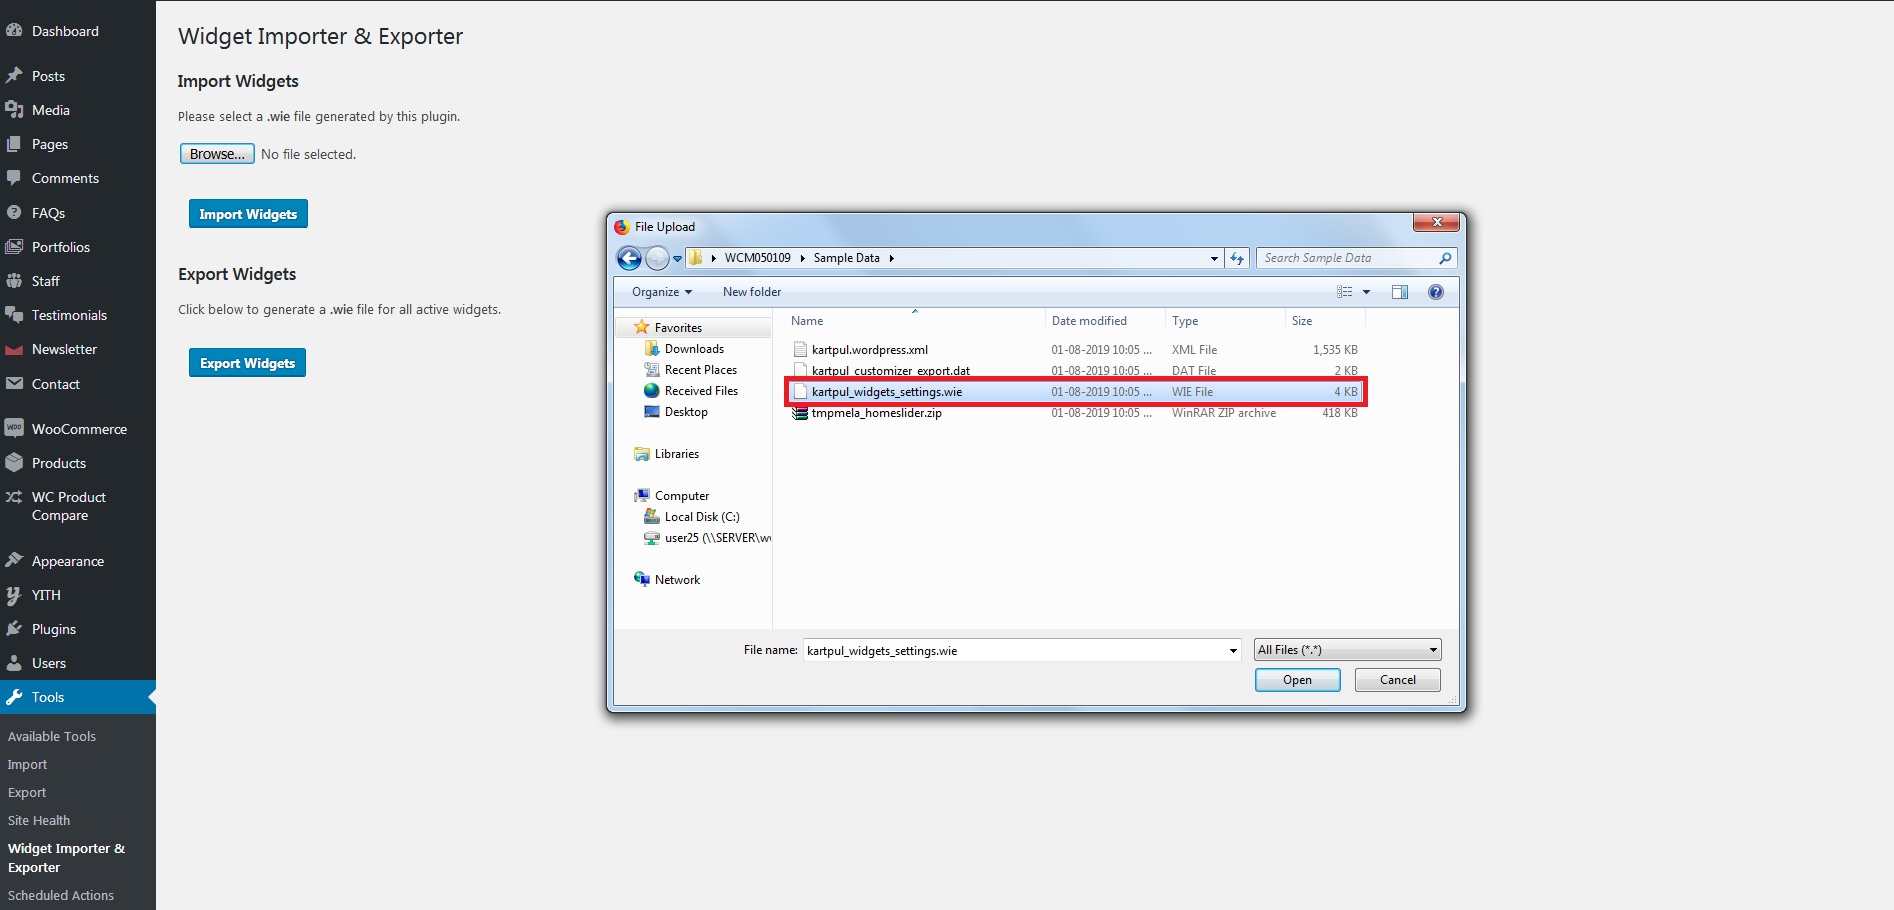
You can import the widget settings using Customizer Export\Import
Plugin follow the below steps
You have already installed Customizer Export\Import Plugin.
Step: 1 Appearance ->Customizer.
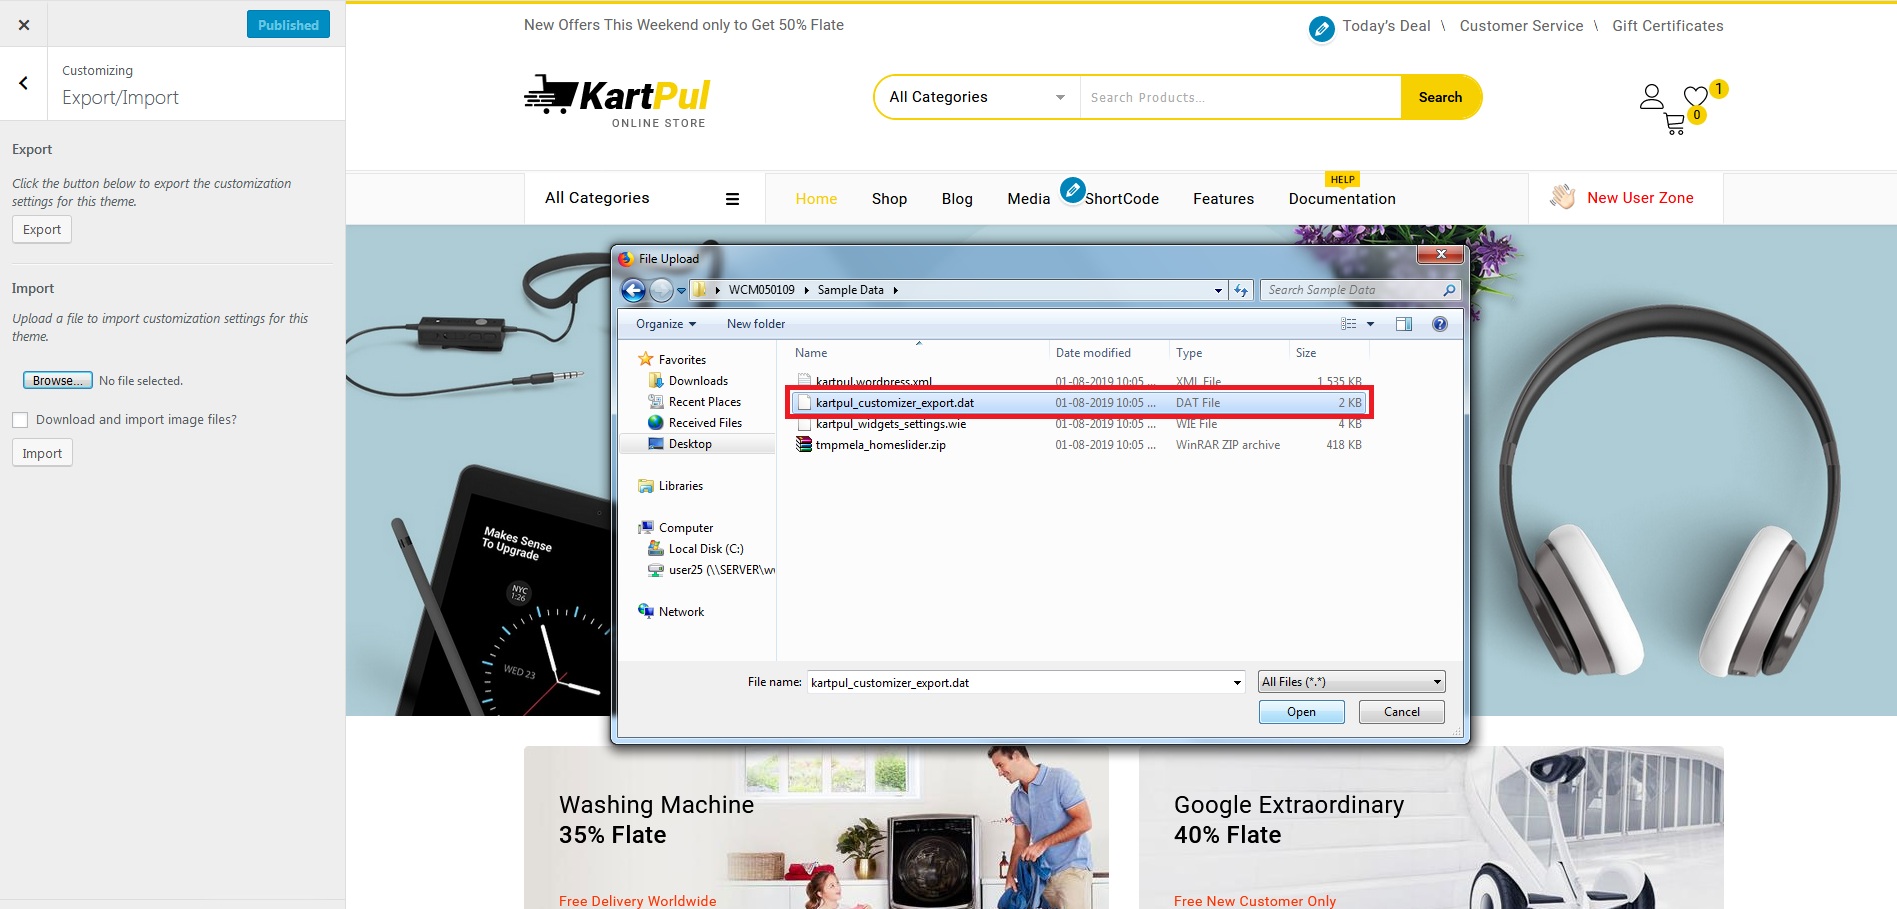
Step: 2 Browse WCM050109_package\Sample Data\WP_Theme_customizer.dat
Step: 3 import button.
Follow this Path.
Step 1 : Click on Customizer

Step 2 : Click on Export/Import Data
 Step 3 : Select DAT file form Sample Data > WP_Theme_customizer.dat file >
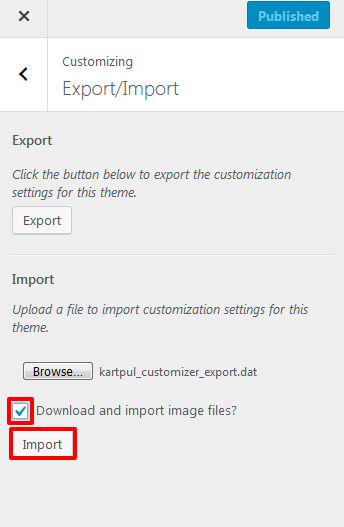
check on download and image import file > import.
Step 3 : Select DAT file form Sample Data > WP_Theme_customizer.dat file >
check on download and image import file > import.
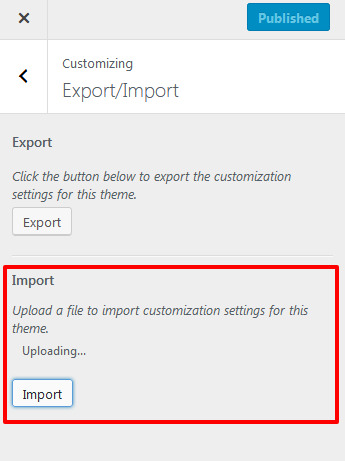
 Step 4 : wait for while your data is imported..
Step-9 : Theme Translation
For translating the theme you need to add the plugin WPML.
For adding WPML plugin follow below Steps:
Step 1: Go to admin panel
Step 2: Click on plugins option
Step 3: Add New plugin
Step 4: Upload plugin
Step 5: Select the directory where the plugin resides and install it.
Step 6: Activate plugin.
As this plugin is pro version you have to buy it
we don't provide it with our theme package.
Step 9.1 : Language Setup
The languages section allows you to turn a WordPress site multilingual.
To manage languages, go to WPML > Languages .
When you configure WPML for the first time, you need to choose the language of existing
content.
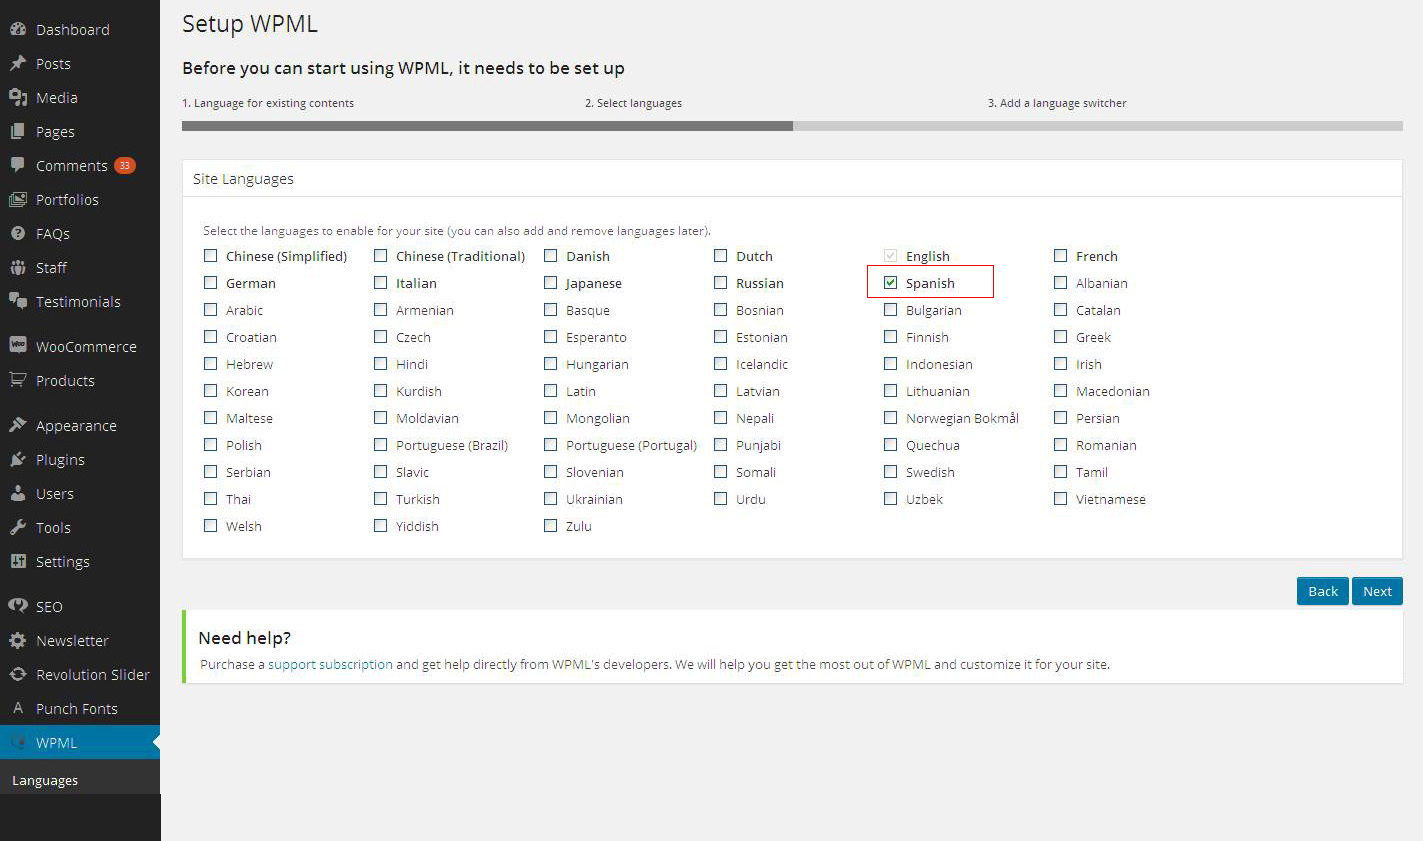 You follow up this documentation for more on how to setup language.
Language
Setup
You follow up this documentation for more on how to setup language.
Language
Setup
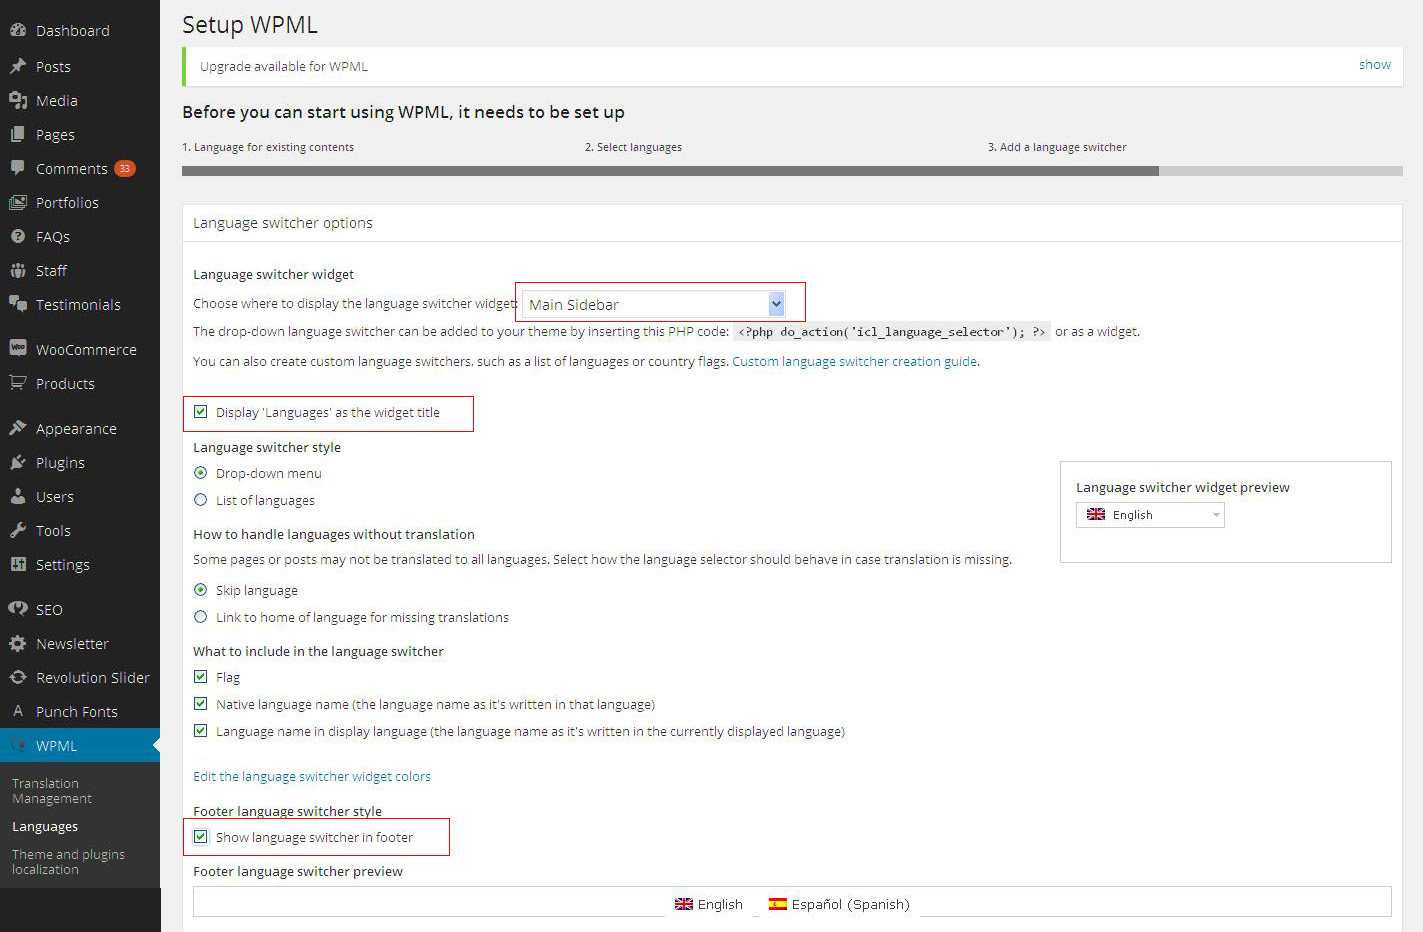
Display the language switcher
You can display the language switcher in sidebar, in the footer by selecting the options
available when you setup a new language.
Step 9.2 : Select Theme Translate Option
WPML allows to get translations for texts in themes and plugins in who ways:
1) The traditional .mo files (good for when you already got that with the theme).
2) Translating the theme’s texts directly from WPML
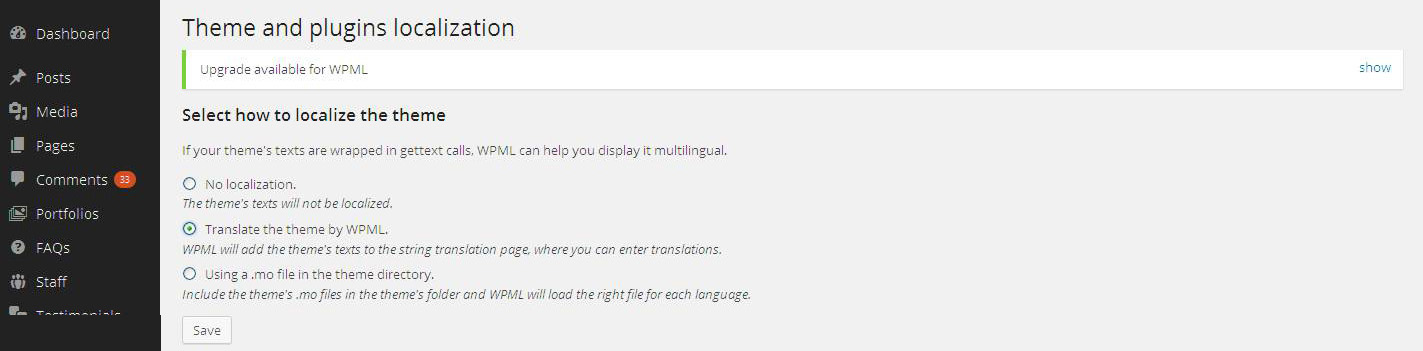
Select translating the theme by WPML option.
And click on Save button.
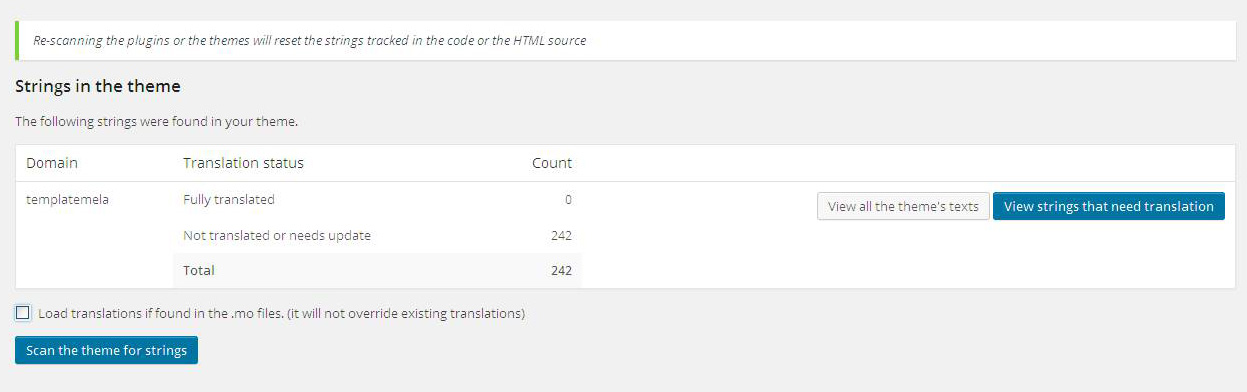
Step 9.3 : Scan Theme Strings for translation
After you clicked on save button you would be able to see the option strings in the theme.
Click on scan the theme for strings.
And it will display the strings that are translated and not translated.
Step 9.4 : String Translation
WPML’s String Translation module is part of the Multilingual CMS package. To enable it, you first
need to download and install from your WPML.org account.
Then, go to WPML->String Translation.
 1) Add the translation of the text into your language.
2) Check the box for translation is complete.
3) And the save the translation.
4) Same way translate all the strings that are not translated.
1) Add the translation of the text into your language.
2) Check the box for translation is complete.
3) And the save the translation.
4) Same way translate all the strings that are not translated.
Step-10 : Troubleshooting
Step 10.1 : Troubleshooting Theme
Installation
The eCommerce theme should be installed without any errors, but here are the most common
errors and the solutions
The package could not be installed. The theme is missing the style.css
stylesheet.
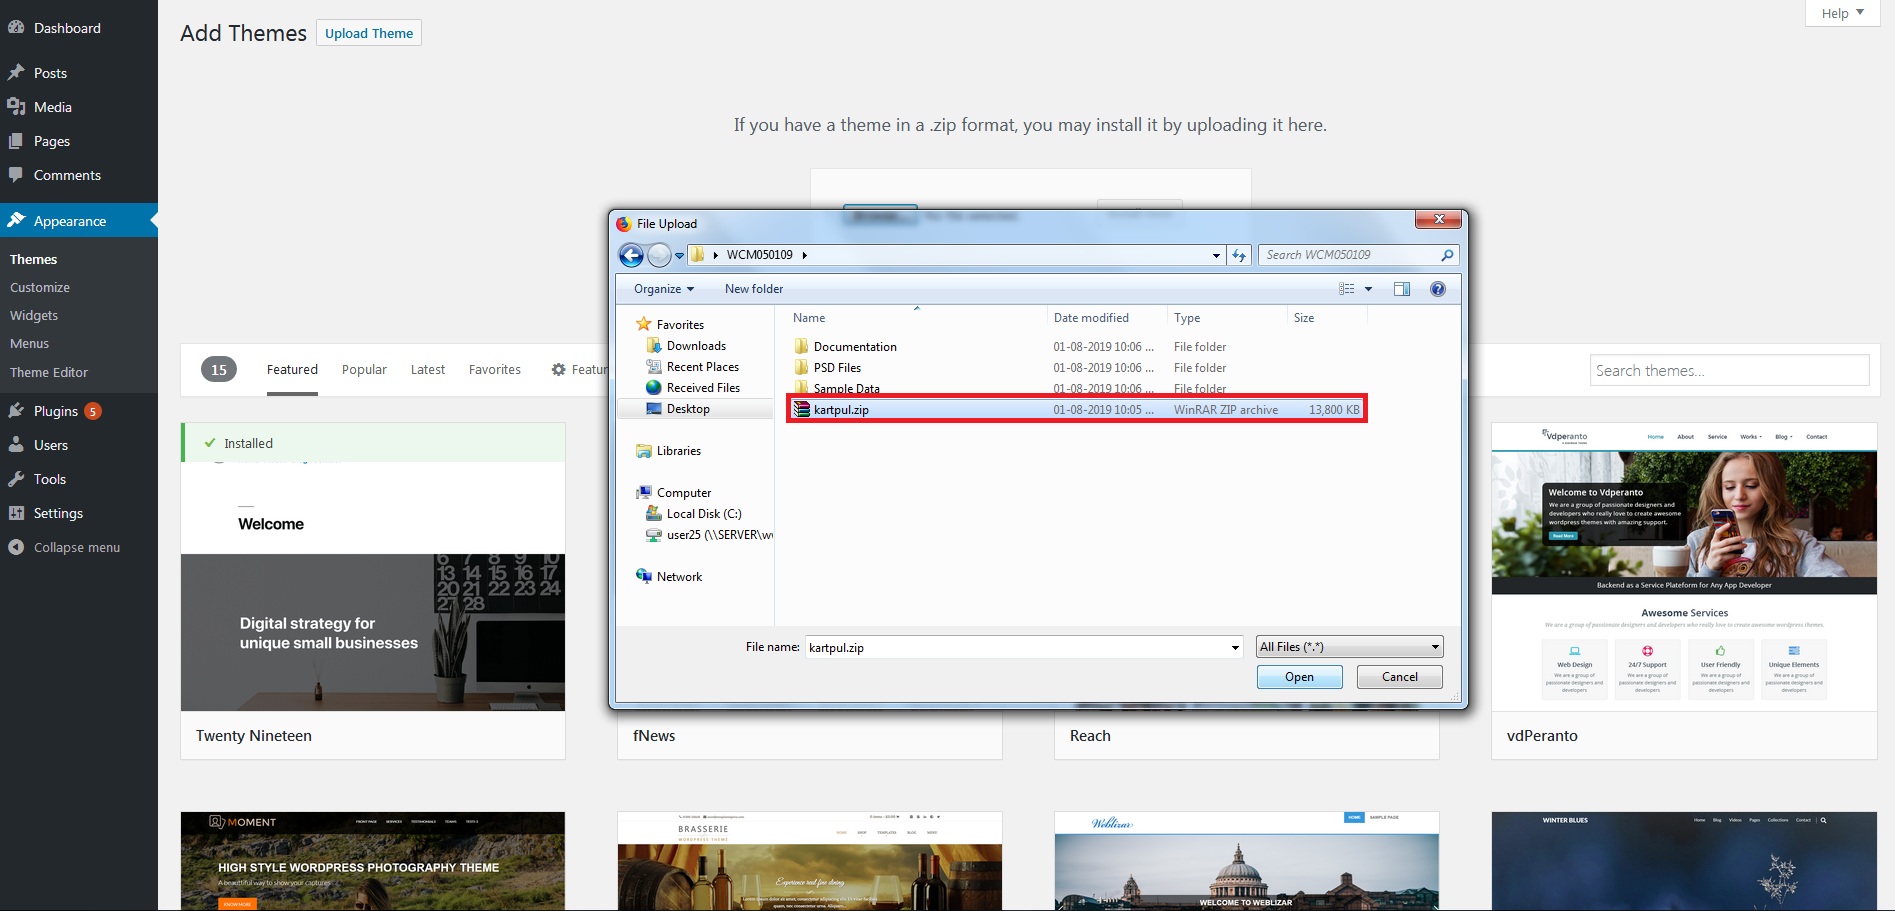
One of the most common reasons people have issues is because they try uploading the full zip
that includes demo content, theme, documentation…etc which displays the “The package could
not be installed. The theme is missing the style.css stylesheet.” error. Please make sure
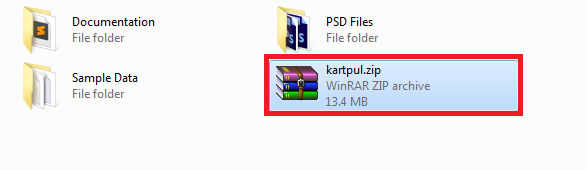
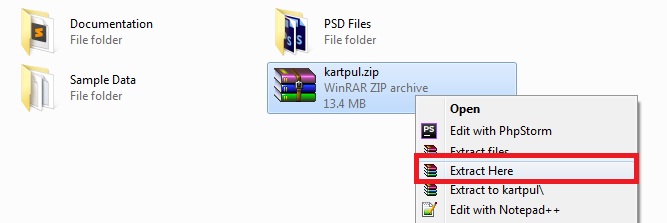
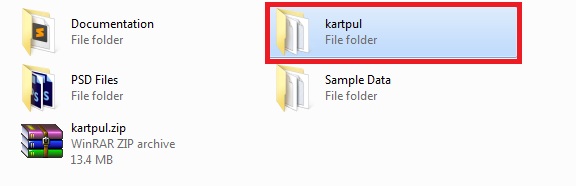
you are uploading only the installable theme which is called kartpul.zip.
Are you sure you want to do this?.
It means you have an upload file size limit. You need to install the theme or plugins via
FTP, or contact your hosting provider to increase the limit.
White Screen Of Death or PHP Error Notice.
A “white screen of death” happens when there is a PHP error on the site but WP_Debug isn’t
enabled on the server. So the first thing to do would be to enable WP_Debug so you can read
what the actual error is and thus fix the problem.
Step 10.2 : Troubleshooting the Demo Content
Import
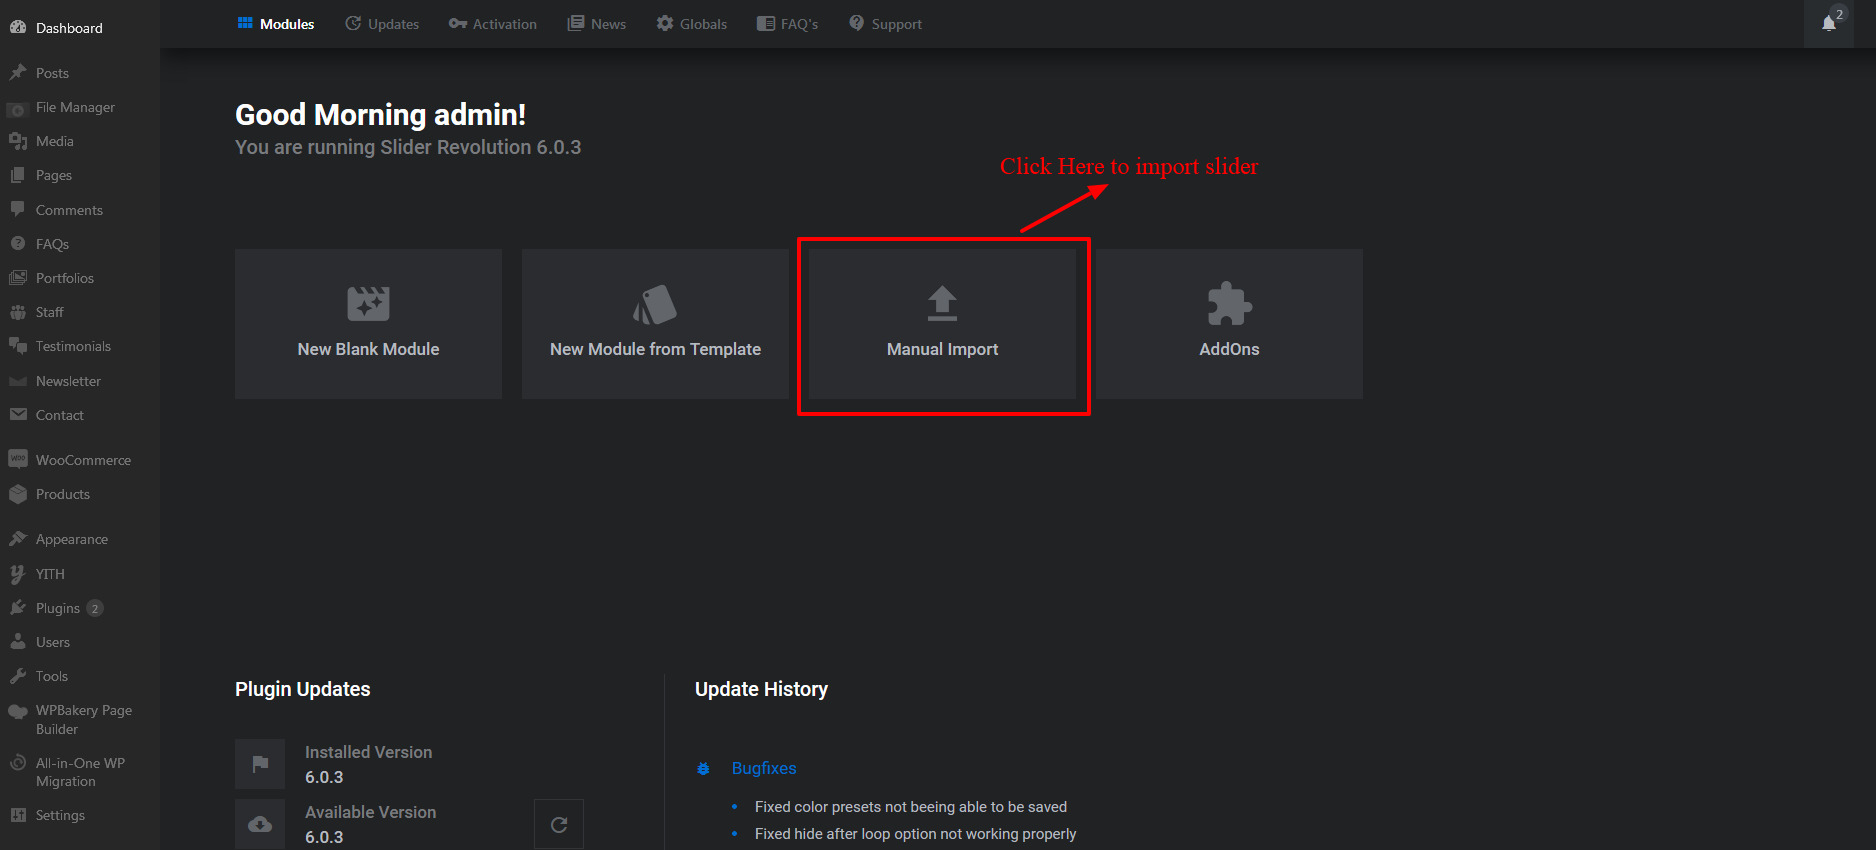
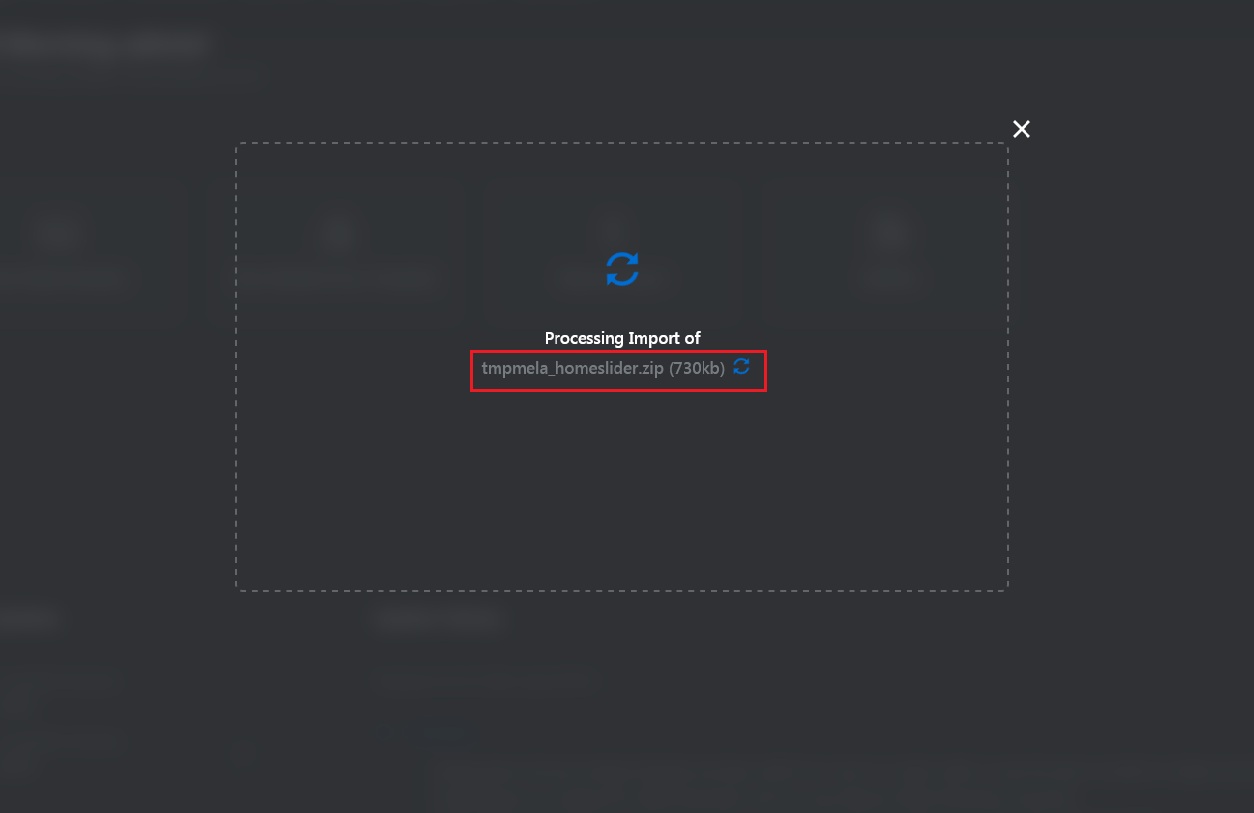
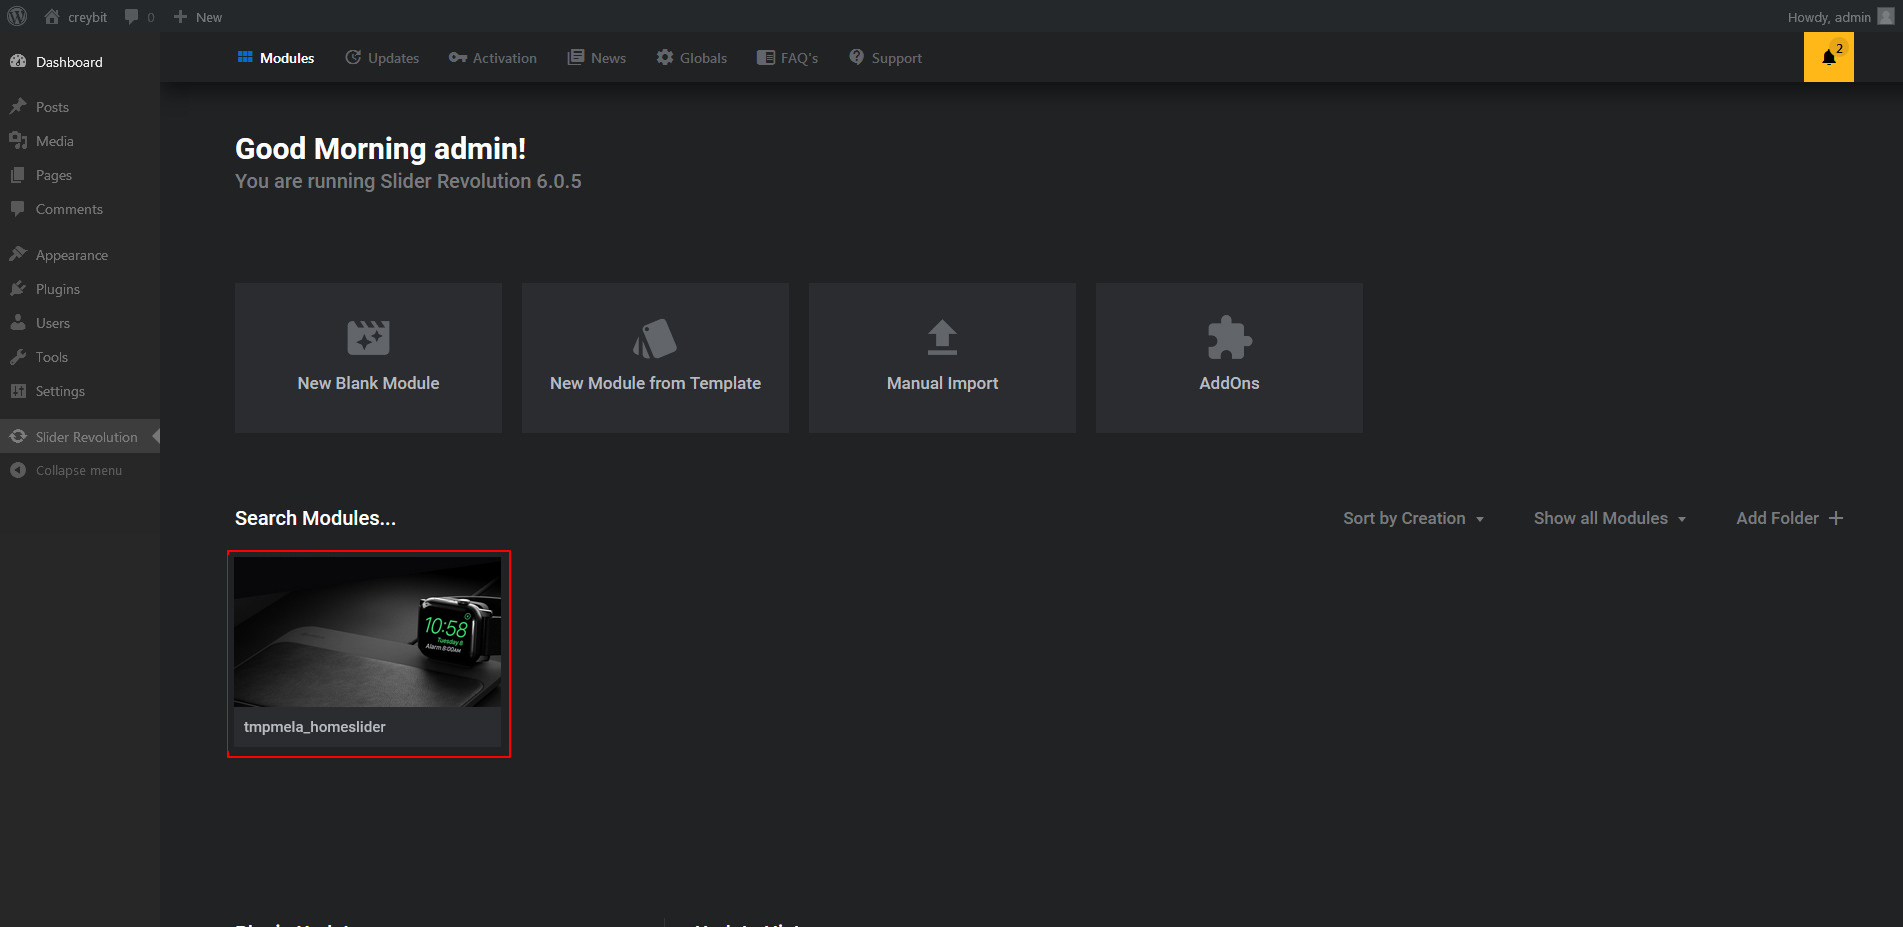
Revolution Slider Error: Slider with alias not found.
This error message means that the slider you are referencing for (either in a shortcode or in
a PHP function) does not exist. Read our How to Import Revolution Sliders article to learn
how to import Revolution Sliders and you need to import the slider that has alias are not
found.
Demo Content Import Fails.
If the import stalls and fails to respond after a few minutes, or it fails with a simple
error message like Import failed, You are suffering from PHP configuration limits that
are set too low to complete the process. You should contact your hosting provider and
ask them to increase those limits to a minimum as follows:
- max_execution_time: 300
- memory_limit: 500M
- post_max_size: 512M
- upload_max_filesize: 256M
500 Internal Server Error.
There are many reasons why these errors occur in WordPress. One of the reasons it is PHP
memory limits set too low. You should contact your hosting provider and ask them to increase
those limits to a minimum as follows:
- max_execution_time: 300
- memory_limit: 500M
- post_max_size: 512M
- upload_max_filesize: 256M